Pygame
Grey overlay
Pink
Green
Blue
Cream
Liliac
Purple
Yellow
Objectives
Developing Programming and Development (learning strand), specifically:
- Understand the concept of Sprites and how they can used as game objects.
- Understand and use variables to change to keep track of the X and Y coordinates of a sprite.
- Understand the process of detecting collisions.
- Understand how to use the random function to generate a random sprite target.
Collision!
- Open your Week5.py file from lesson 5 in pyGame. It should be in your home drive, stored in your Year 9 Game Development folder.
Learn It
- We are going to make a simple game and learn to use collisions.
Try It
- In addition to the sprite we made in the previous lesson, we will create another sprite using a basic shape called target. We will then detect if player1 has collided with the target.
- First we need a variable to hold the x and y position of the target.
- Add these lines at the bottom of the lines of the game setup section, directly underneath the line that says: player1Image=pygame.transform.scale(player1Image, player1ImageSizeXY) which you wrote in the last lesson. It'll be around line 20.
pygame.mouse.set_visible(False)
targetXY = [500, 500]
- Your code will look a little like this now:

- Next, we will draw the target sprite onto the screen.
- Add the following lines of code in your game loop, directly underneath the line that says: player1XY=newXPosition, newYPosition
- NOTE: You'll need to indent each of these lines twice, to that they're part of the FOR event loop.
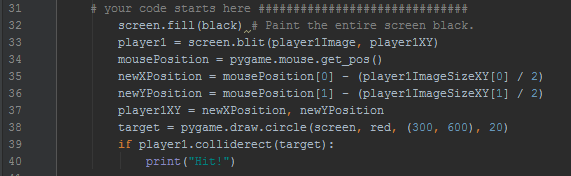
target = pygame.draw.circle(screen, red, (300, 600), 20)
if player1.colliderect(target):
    print("Hit!")
- The code should look like this:
- Run the code, and see what happens?
- Printing 'hit' in the console is not very exciting. Let's change the code so the target disappears and reappears at a random x and y position when touched by the player sprite.
- In order to use the random numbers, we need to import some extra code to allow it.
- Add this line at the very top of your program:
import random
It'll look like this:

- Next, we can use a new function called: random.randint() to create random numbers for the x and y postions of the target. Comment out the print("hit") line you wrote previously by placing a hash symbol (#) in front of it.
- Then add the following lines underneath. Don't forget that they're part of the IF block, so will need to be indented with the tab key three times.
targetXY[0] = random.randint(0, SCREENWIDTH)
targetXY[1] = random.randint(0, SCREENHEIGHT)
- We will also need to stop hard-coding the coordinates of our target, and start using the new randomly chosen coordinates. A few lines above where you made these changes, find the line that says:
target = pygame.draw.circle(screen, red, (300, 600), 20)
- Change it to say:
target = pygame.draw.circle(screen, red, targetXY, 20)
- The code should look a little like this (the line numbers won't be exact, but will be in this area of the program):

Test It
- Run the program to test it.
- There are a number of improvements we can make.
- It would be better if the user had to collide with the target and click the mouse to score a point. We could add this by changing our collision code slightly.
- Add another IF statement inside the game loop to force the user to click on the target. NOTE: Only the first line below is to be added; the others are shown to help you see where to place the code, and help ensure it is indented correctly.
if pygame.mouse.get_pressed()[0] == 1:
    if player1.colliderect(target):
    # print("Hit!")
    targetXY[0] = random.randint(0, SCREENWIDTH)
    targetXY[1] = random.randint(0, SCREENHEIGHT)
- The code should look something like this. NOTE: The lines of code under the new IF statement will all need to be intended.

- This new feature also introduces a bug; the player can hold down the mouse button constantly, so that they just have to touch the target.
- This is slightly more complex to fix. We'll need to create a variable to prevent the player from 'firing' again until until the mouse button is released.
- Create the fireLock variable and set to: 0 at the start of the game, so the player can fire. Add this line of code just before your game loop:
fireLock = 0
- So it looks like this:

- Next, we'll need to set: fireLock to: 1 when the mouse button is pushed, by modifying our IF statement from before a little bit.
- Find the line that says:
if pygame.mouse.get_pressed()[0] == 1:
- Change it to:
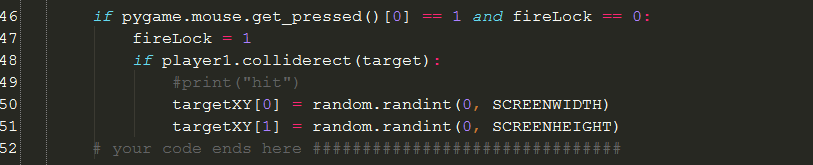
if pygame.mouse.get_pressed()[0] == 1 and fireLock == 0:
    fireLock = 1
- The code should now look something like this:
- Finally, we'll need to make it so that we only reset: fireLock to 0 when the mouse button is released. We do this by adding another event listener to our event loop.
- Add this IF statement inside the: *gameState = "exit"* line in your game loop.
if event.type == pygame.MOUSEBUTTONUP:
    fireLock = 0
- It should look like this when done:

- If you find yourself unsure of how to complete this lesson, this video tutorial may help:
Badge Tasks
- Silver: Add comments to your code and in comments below your code.
- Gold: The target is currently drawn over the top of the player - Fix this bug so that it appears behind.
- Platinum: Change the target circle to an image of your choice instead.
Badge It
- Be honest and take the quiz below to assess your own progress. Your teacher will randomly check some students work to moderate their marking.
- Once you have done above tasks and tested they are working as intended, click here for the self assessment.