Various Variables
Twinkle Twinkle
Learn It
- One of the most useful thing about computers is the ability to store information and change it.
- Computers can store different types of data, such as:
- Integers (whole numbers, like
1,2,0,-500) - Booleans (
TrueandFalse) - Characters (e.g.
a,@,-, or?) - Strings (several characters together, e.g. this sentence)
- Real numbers (E.g. 2.5, -6.2, 3.141572)
- Integers (whole numbers, like
- We'll use some variables today to make patterns on the Micro:bit display.
Learn It
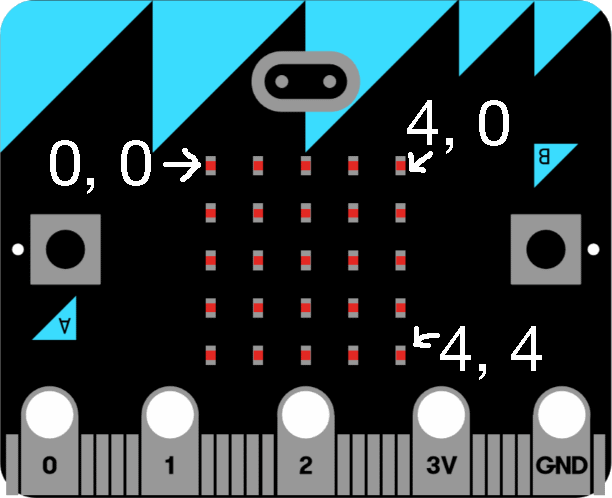
- The display on the Micro:bit uses co-ordinates just like in maths to describe where each of its LEDs are.
- The top-left LED has an
xposition of 0, and ayposition of 0, or we write (0, 0) as a shorthand. - The LED to the right of that is located at
(1, 0). The one immediately underneath that is(1, 1)and so on. The bottom-right most LED is therefore located at(4, 4).
- We can turn on a single LED with this command:
display.set_pixel(x, y, howBright)
- We replace
x,yandhowBrightwith numbers to indicate which LED we want to illuminate, then a number from 0 (off) to 9 (full power) for how bright the LED should be.
- Let's make an app to make an attractive light show. We'll start with something quite simple, then slowly make it more elaborate.
- To start with, let's just aim to make the left-most LED come on, then the next one, then the next and so on until the top row is all turned on.
- Once the full row is on, we'll clear the display and start over. There are a few ways we could do this. One way would be like this:
Code It
- Open a new Micro:Python window, delete the example code, and paste this in:
from microbit import *
howBright=9

while True:
    display.set_pixel(0, 0, howBright)
    sleep(500)
    display.set_pixel(1, 0, howBright)
    sleep(500)
    display.set_pixel(2, 0, howBright)
    sleep(500)
    display.set_pixel(3, 0, howBright)
    sleep(500)
    display.set_pixel(4, 0, howBright)
    sleep(500)
    display.clear()
- This is 15 lines of code in total, and would do the job we want.
- There are some issues here, though. What if we wanted to make it move faster by reducing the
sleep()time? We'd need to change the 500 in five different places. - What if we wanted to make it light up from right to left? We'd need to reverse all the numbers.
- What about lighting all the other rows of pixels at the same time so the whole display shows the effect? We'd need to copy and paste the chunk of code another four times, then we'd have to modify each one individually. The resulting program would be huge!
- There's got to be a better way, and this is where variables can help.
Code It
- Delete the code from before, and replace it with these 10 lines.
from microbit import *
x=0
howBright=9
while True:
    display.set_pixel(x, 0, howBright)
    x+=1
    sleep(250)

    if x==5:
	display.clear()
	x=0
- Let's consider our code…
- The
x=0line is setting up a variable called X and assigning it the value 0. - The
howBright=9line is to hold how bright we want the LEDs to come on when they light up. while Truetells the computer that we're starting a loop, which will continue forever. We call this an infinite loop.- NOTE: The commands that we want to repeat are 'tabbed' in on the page so that they stick in a few spaces more than the lines before it. This is important; one of the most common causes of coding errors are made by not indenting code when needed.
- The
display.set_pixel(x, 0, howBright)line asks the Micro:bit to turn on the LED located at position x (worth 0 the first time we run through the program), in column 0 with a brightness of howBright (worth 9). - Next, the
x+=1line tells the computer to add 1 to the value of x. If it was 1, it'll become 2, if it's 2, it'll become 3 and so on. sleep(250)tells the Micro:bit to wait a quarter of a second before it performs the next command.- The
ifstatement tells the Micro:bit to see ifxis worth 5. If it is, the next two instructions are carried out (notice how these instructions are also indented?) - IF x is 5, then the display is cleared (all LEDs turned off) and
xis reset back to 0. - This is the last line of code indented in the
whileloop. Once it has been carried out, the next line of code will be thewhile True:line again as the loop restarts. - If you need a little extra help, the video tutorial walks you through everything in this lesson…
Badge It
After following the above istructions or video tutorial, try to write programms for the following tasks:
- Silver: Write a program that uses if statement and variables to make a pattern that scrolls down vertically rather than horizontally.
- Gold: Write a program that uses if statement and variables to make your pattern fill the first two columns rather than just one.
- Platinum: Write a program that uses if statement and variables to make your pattern fill all the columns, AND have the brightness increase each time a new LED is turned on. When the brightness reaches 9, it should start again at 1.